Run your first sample app
Think of this lesson like touring a model home before building your own. You are going to download and run a complete, working application to see exactly how it operates. This hands-on experience shows you what the tools from your development environment actually do when they work together.
What you learn here: You download a working "Hello World" application, get it running locally, and interact with it successfully. By the end, you have a live Atlan application running on your computer.
Before you begin
Before you start, make sure you have:
- Completed lesson 1 - Set up your development environment
Core concepts you learn
Before you start running commands, you need to understand what you are about to see in action. Think of these concepts as the key components of the house you'll be exploring:
Workflow
A workflow defines what needs to happen and in what order, like a blueprint that shows how rooms connect and systems integrate.
Activity
Individual tasks within your workflow. Each activity handles one specific job, like calling an API or processing data, with built-in error handling.
Worker
The reliable executor that runs your workflows and activities. Workers help your application continue running even when things go wrong.
Now that you understand the core concepts, time to see them in action. You are going to download and run a real application to experience these concepts firsthand.
Download sample application
Time to get your hands on a real application. You are going to clone atlan-sample-apps repository that contains a complete Hello World application built with the Atlan SDK.
-
Clone the repository: Open your terminal and run this command to download the application:
git clone https://github.com/atlanhq/atlan-sample-apps -
Navigate to the project: Move into the Hello World project directory:
cd atlan-sample-apps/quickstart/hello_world
What you just downloaded
You now have a complete Hello World application on your computer. This is a real, working Atlan application that demonstrates all the core concepts you learned about earlier.
Explore the project structure
📁 hello_world/
├── 📄 main.py              # Entry point that starts your application
├── 📄 pyproject.toml       # Lists all Python packages your app needs
├── 📁 app/
│   ├── 📄 activities.py    # Individual tasks (Activities)
│   └── 📄 workflow.py      # Main application logic (Workflow)
├── 📁 frontend/            # Web interface you'll interact with
├── 📁 tests/               # Test files to verify everything works
└── 📄 Dockerfile           # Docker image build
Each file has a specific purpose in making your Atlan application work properly.
With the application code on your computer, the next step is preparing it to run. Just like preparing a model home for viewing requires connecting all utilities first, your application needs its dependencies installed before it can start.
Set up project dependencies
Your application needs specific Python packages and tools to run properly. The project uses UV (which you installed earlier) to manage these dependencies efficiently.
-
Initialize project environment: This command creates an isolated virtual environment for this project and installs all required dependencies:
uv sync --all-extras --all-groupsUV automatically:
- Creates a
.venvdirectory inside your project - Downloads and installs Python 3.11.10 (specified in
pyproject.toml) - Installs all Python libraries your application needs
This project-specific environment keeps dependencies isolated, so different applications never conflict with each other.
Prefer traditional virtual environment activation?
After
uv synccreates your environment, you can optionally activate it to use standard Python commands directly:On macOS and Linux:
source .venv/bin/activateOn Windows:
.venv\Scripts\activateOnce activated, you can run
python main.pyinstead ofuv run main.py. This tutorial usesuv runcommands because they work consistently across all systems without requiring activation. - Creates a
-
Set up precommit hooks: Configure automatic code quality checks that run before you save changes to maintain clean, consistent code:
uv run pre-commit install -
Download required components: Get Temporal server, database, and other services your application needs to run workflows:
uv run poe download-components
Your application is now ready to come alive. Think of this moment like unlocking the doors and turning on the lights in a model home—all the systems are in place, and now you get to see everything work together.
Run your application
Time for the exciting part—seeing your application in action. You need to start two things: the supporting services (like Temporal) and then your actual application.
Start the supporting services
-
Open a new terminal window (keep your current one open) and run:
uv run poe start-deps -
Keep this terminal running: This command starts Temporal and other services your application depends on. These services need to stay active while your application runs.
Launch your application
Return to your original terminal and start the Hello World application:
uv run main.py
You see output similar to this when everything starts correctly, and you see that the server is assigned a process id, and started at port 8000:
➜  hello_world git:(main) ✗ uv run main.py
2025-08-17 22:03:09 [INFO] __main__ - Starting hello world application
2025-08-17 22:03:09 [WARNING] application_sdk.application - No application manifest found, skipping event registration
2025-08-17 22:03:09 [WARNING] application_sdk.docgen - mkdocs is not installed. Please install it using 'pip install mkdocs'
2025-08-17 22:03:09 [WARNING] application_sdk.server.fastapi - Directory 'dist/site' does not exist
2025-08-17 22:03:09 [INFO] application_sdk.server.fastapi - Starting application on localhost:8000
INFO:     Started server process [62315]
INFO:     Waiting for application startup.
INFO:     Application startup complete.
INFO:     Uvicorn running on http://localhost:8000 (Press CTRL+C to quit)
Perfect! Your application is now running and ready to use.
Test your application
Time to see your application in action! Your Hello World application creates a web interface you can use:
-
Open your web browser and go to
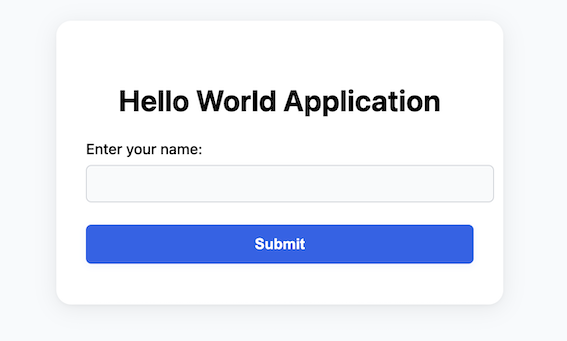
http://localhost:8000. You see a simple form asking for your name. Type "John Doe" in the text field.
-
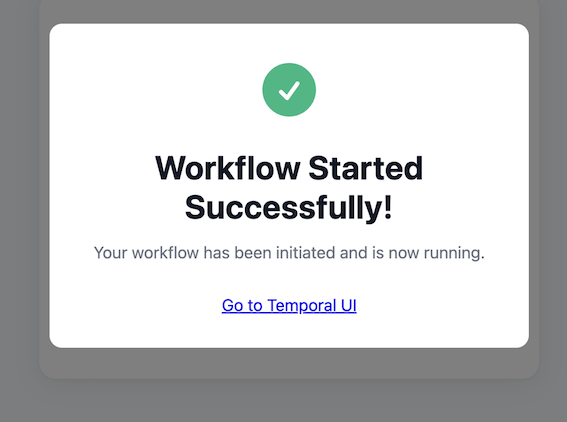
Click the Submit button. Watch as the application processes your request! Behind the scenes, the workflow extracts your name parameter ("John Doe") and shows you a confirmation screen. Notice the link that appears—this takes you to see what's happening inside your application.

-
Click the "Go to Temporal UI" link. Now you're looking at the Temporal dashboard—this is like viewing the home's control panel where you can see all systems operating! Look for the
say_helloactivity and watch your personalized greeting being processed.
You did it! You have successfully run your first Atlan application. You downloaded the code, installed the dependencies, started the services, and interacted with a live application that processes workflows in real time.
Your computer is now running a complete Atlan application with Temporal workflows, Python services, and a web interface—all working together seamlessly.
What's next
You have successfully run your first Atlan application and seen all the development tools working together. You downloaded code, installed dependencies, launched services, and interacted with a live application.
The repository you just worked with is a GitHub template, which means you can create your own copy.
In the next lesson, you use the repository as a starting point for building your own custom application using the patterns and tools you learned here.
Continue learning
Ready for the next challenge? Time to build your own custom application → Build custom app